


Website made using only Xara Web Designer, and no other graphics or software tools.


Repeating Items
It’s common to have some items which are the same on all pages of your website. The heading text, the header design, the top navigation buttons and the page footer on this website are good examples. In Web Designer these are called ‘Repeating objects’. A small flower symbol like this is shown in the top right corner when they are selected. It’s easy to create your own repeating item. Try adding an object to this page, say a photo, or draw a rectangle, or perhaps some clipart. Using the Selector Tool select the item and the menu Arrange -> Repeating object -> Repeat on all pages. Using the Page & Layer Gallery you can see the item is now repeated at the same position on all pages. If you change it or move it, all copies are updated. Tip: If you don’t want the item on one page, just delete it off that page. If you want one copy not to be updated automatically just select the object and use Arrange -> Repeating object -> Stop repeating.Responsive Web Design
Mit der Software Web Designer you can create mobile optimized websites which dynamically adjust to different width devices. So you can create a version of your website that is tailored to narrow screen phones and at the same time offers a different layout and text sizes more suited to wider screen devices such as tablets and desktop browsers. Here is an example, that provides three layout variants for mobile, tablet and normal desktop browsers. All of the web themes in Web Designer include mobile variants, but if you have based your site on an older theme or created your own design, then you can add variants to your own design. Start by right clicking on the page background and selecting Website Variants > Website Variants > Create. Read this popular online intro to get you started.Supersites (Web Designer Premium only)
Supersites are an advanced feature of Web Designer Premium. They can be single scrolling pages or have eye-catching page transitions to help make your website stand-out from the crowd. Supersite example 1 : A responsive restaurant menu aimed at tablets and desktop browsers. Rotate your device (or change browser width) to see a different layout for landscape and portrait (this is not aimed at mobile) with an automatic fit-to-screen effect. Supersite example 2 : A simple photo slideshow with fit-to-screen, orientation detection, and Retina resolution images. Note this contains large hi-res photos so is best on fast connections. Both these examples support swipe gestures on touch devices to navigate from page to page. To export your site as a Supersite right click on your page and select Web Properties, in the Website tab select Web Export Options and check the Supersite option. Now you can choose between the scrolling and transitions styles.Presentations (Web Designer Premium only)
If you’re using the Premium version of Web Designer you can create web-based presentations, which are a web-based PowerPoint-like slideshows which your visitors can step through. Here’s an example web presentation.Sticky Objects & Stretchy Backgrounds (Web Designer Premium only)
Two very common features of contemporary web designs are Sticky Objects (objects which ‘stick’ in place as you scroll up and down the page, typically NavBars or social network buttons) and backgrounds that stretch across the whole width of the browser window. Here’s an example website with both sticky objects and stretchy backgrounds. Creating them is easy, right click on the object and select Web Sticky/Stretchy to define what you want to stick or stretch and where.Google Fonts (Web Designer Premium only)
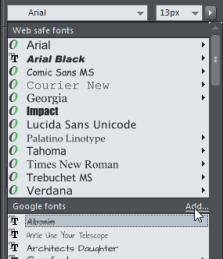
This text uses a font called Open Sans, a clear, modern family of fonts that are bundled with Web Designer. But you now have a choice of over 600 fonts, thanks to Google Fonts. Web Designer includes a great font picker, and will automatically download and install any font you choose. Better still, these are normal Windows fonts that, once installed, will work with any Windows application. When used in web documents these fonts are served from Google’s servers (saving you bandwidth) and are compatible with all modern web browsers. To view and install a Google Font, from the font drop down menu (Text Tool), just click the Add link shown here.Text flow around
To make any object repel text right-click on it and select ‘Repel text under’. Now, as you move the object around the page, it repels text around it. This will of course re-arrange everything on your page, and may require you to re-position items or change the page size to accommodate the overflowing text.Page adjustments
If you add or remove text here, the page resizes to accommodate the text changes, all the items lower down the page shuffle up or down as required, including the graphics and the footer. Even the flower graphic at the bottom of the page remains in the correct place. These are controlled from the Position on Page context menu (right click in the Selector Tool). Items with Push set (such as this column of text) will push the page footer all other items marked with ‘push’. You can paste graphics or photos to inline in the text, or you can anchor floating graphics to a point in the text. This means that the graphic can move with the surrounding text as you edit. The two images immediately below are examples - add a few empty lines into the text here to see them move.Page selection and view
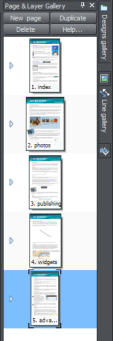
The Page & Layer Gallery is shown on the right side of the window. Just click a thumbnail to move to the required page. Click the small triangle next to each page thumbnail to expand the Gallery to show the layers on the page. If you prefer the scrolling document view, where all pages are shown one below another ‘word processor style’, right click on the page background and select ‘Multiple Page View’. You can easily re-order pages by simply dragging them in the Page & Layer Gallery. You can also rename, add or remove pages and objects.Other Tools
Let’s explore some of the other tools and features of Web Designer. You can try these things on the semi-transparent ‘speech bubble’ graphic below. Remember for most operations you must select the item first (click on it using the Selector Tool). Change its color: Drag a color from the Color Line below onto the shape. Or try the Color Editor (Ctrl+E). Change its size, position, angle: Using the Selector Tool just drag on the 4 control points around the shape. Give it a soft shadow: Select the Shadow Tool, and drag on the bubble shape. Adjust the controls at the top. Give it a graduated color fill: Select the Fill Tool (paint tin icon), and drag across your shape. Drag the ends of the arrows to adjust. Try dropping a color on the ends of the fill arrow. Or select an arrow end and try the Color Editor (Ctrl+E). Make it semi-transparent: Select the Transparency Tool (wine glass) and adjust the transparency value using the slider at the top. Drag the shape over the page to see the transparency effect. Better still: In the Transparency tool, drag across the object. You’ve just given it a graduated transparency. Edit Shape: This is a little more advanced. Select the shape, go into the Shape Tool (on the flyout menu of the third tool on the left). Then drag on one edge of the shape, or on one of the small control points. If you’ve used vector ‘bezier’ editing tools you’ll be familiar with this. Finally: Preview any of your changes - everything you do ‘just works’ in the web browser! (If you’ve used other web authoring, HTML editors or graphics software you’ll realize just how much of an advance Web Designer is. The ability to re-position anything with complete freedom, along with the graphics tools, and accurate WYSIWYG results make Web Designer unique amongst web authoring tools.)Final Note - Add Online Editing & Collaboration with Xara Cloud
Xara Cloud offers an ultra-simple way to edit the text & graphics of your Xara website online in a web browser, using any device (yes even a Mac, iPad or Android tablet!) and to re-publish the website. It’s the perfect answer if you want to update the text of your site remotely, or work collaboratively with colleagues or clients. You can find out more about adding Xara Cloud to your Web Designer here.


Same website, different layouts optimized for
different devices. Click to enlarge.